Thursday, December 1, 2011

Fabulous recipe!!

I made this super easy, fast and DELICIOUS recipe last night, and had to share!!!  It's one of those, lick-the-bowl-and-everything-that-has-some-of-this-stuff-on-it kind of recipes.  


From OhSheGlows


Yield: Serves 2
Ingredients:
  • 1 medium sized ripe Avocado, pitted
  • 1/2 lemon, juiced + lemon zest to garnish
  • 2-3 garlic cloves, to taste (I used 3 and it was quite garlicky, but if you are not a big fan of garlic use 1 clove)
  • 1/2 tsp kosher salt, or to taste
  • ~1/4 cup Fresh Basil, (probably optional)
  • 2 tbsp extra virgin olive oil
  • 2 servings/6 oz of your choice of pasta (I used 3oz of spelt and 3 oz of Kamut spaghetti)
  • Freshly ground black pepper, to taste

Directions:
1. Bring several cups of water to a boil in a medium sized pot. Add in your pasta, reduce heat to medium, and cook until Al Dente, about 8-10 minutes.
2. Meanwhile, make the sauce by placing the garlic cloves, lemon juice, and olive oil into a food processor. Process until smooth. Now add in the pitted avocado, basil, and salt. Process until smooth and creamy.
3. When pasta is done cooking, drain and rinse in a strainer and place pasta into a large bowl. Pour on sauce and toss until fully combined. Garnish with lemon zest and black pepper. Serve immediately. Makes 2 servings.
Please note: This dish does not reheat well due to the avocado in the sauce. Please serve immediately.

Check this girl out!  She has awesome recipes!!!!  You MUST try this one.  All of my kids liked it, even those who don't like avocado.  It tastes like a good pesto/baba ganouch.   SOOOO yummy.  I took some over to my neighbor and she had to make it for dinner, too!  Let me know if you try it.  :)

Sunday, November 13, 2011

Dishwasher Soap

I have been so frustrated with my dishes lately!!  I run my dishwasher once a day, and have been using Shaklee's dishwasher detergent powder.  LOVE it.  Well, I ran out and was at Costco so got some Cascade action paks, which I have used in the past with great success.  Not this time-I have had serious white residue on my dishes every time I wash them.  Yuck!!

Enter new idea...  I read on a blog (maybe Grocery Shrink?  wish I could remember for sure, sorry!!) that the gal ran out of dishwasher detergent and the only other non-sudsing soap she had on hand was her homemade laundry soap.  This clicked on a light in my head, and I thought, "Hey-I have homemade laundry soap, too!  I should try it!"  Well I did, and it worked!!!  I ran a load of dishes and they came out clean with NO yucky residue!!!

I am going to return the rest of my Cascade to Costco tomorrow and keep using my laundry soap in the dishwasher.  Anyone out there use something in the dishwasher they love?

Update:  the homemade soap worked a couple of times, then started leaving a buildup as well.  I purchased some Lemi-shine, a product I have heard great things about.  When I add this to the soap, it works much much better.  It still irks me to have to add so much stuff.  Why isn't it just cleaning as well as it was before?  grrrrr

Saturday, October 29, 2011

Owl Cake

OK.  I cannot wait to share this any longer-it is too adorable!!  Shauna MADE this AWESOME cake for her niece's birthday.  It was a "Night Owl" party. The girls watched Tangled, played some really cute games, had pizza and cake, and I painted their toenails.


Inspiration came from this adorable cake at SnowyBliss:


Shauna made the fondant using a marshmallow fondant recipe.  She says using that fondant is awesome.  I helped a teeny tiny bit, and it did seem to work really well.  (i don't have much experience with fondant to compare it to, so take her word not mine)  :)


The bottom two cakes are real, and the owl is a styrofoam ball.  "Hoo-Hoo" would have guessed that?  I guess it would be sort of difficult to make a spherical cake.


The birthday girl LOVED it, of course.  "Hoot" wouldn't?   hahaha  OK, enough corny owl humor already.


Bottom line:  When it comes to cakes, Shauna's good.  Real good.  Here is your proof.  :)

Sunday, October 16, 2011

Strawberry Smoothie Tip

Shauna and I recently became the proud owners of Blendtec blenders.  We went back and forth between wanting Vitamix and Blendtec.  We finally went with the Blendtec, for reasons we may get into later.  They are both fantastic products and knew we couldn't go wrong with either, though.

Anyway, on to the tip!!  With this awesome blender, I no longer have to remove the leaves from strawberries!  There are great vitamins and such in those leaves, and I always removed them before because my old blender didn't totally blend up green leafy things.  I guess I could have left them, but never thought about it.  It makes freezing strawberries so easy, no hulling them, just wash and place them out on baking sheets and freeze.  Once frozen, place in bags and they are easy to pull out as needed.


Friday, September 30, 2011

Fall around my house

It was time.  I pulled out my fall decorations and dressed up the house a bit.  I LOVE this part of the year!!  Here is the little dresser that I made over in a harlequin pattern.  I heart this dresser so much now!!  It makes me smile whenever I see it.


This is a shelf I made that fit a little spot perfectly in my last house.  It is a bit small in this house, but until I make (or get) another one, it is fine for now.  


The pinecones came from the neighbors tree.  They won't miss them, right?  They were on the ground, so that makes them community property I think.  Some were even in my yard so they totally count as mine...  :)  
I got the inspiration for arranging the cornucopia on Pinterest. 


I am debating whether I should keep the fall colors of the squash, or paint them creams and light blue-grays, like I've seen around the web.

Here is our music cabinet.  The only money I spent on my fall decorations this year is the $2.50 for this little grapevine pumpkin.  I have a goal to get one new pumpkin every year. 


That cabinet is totally full, so I got this baby at Goodwill for 9 bucks!!! 


 It is a 2 drawer file cabinet.  The drawers are deep and it will hold a lot of music.  I love the front pulls and label slots.  I am still thinking of what color to paint it.  Something not too dark, I am into light and bright these days.  Hmmm, will have to think about this one.

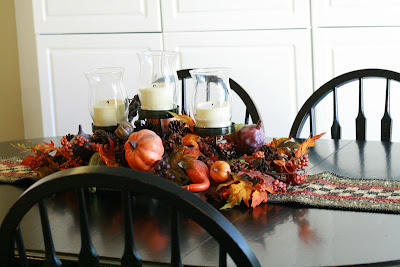
Here is the dining table, with the centerpiece I have had for years.  I got it at Kirkland Home, one of my favorite little stores.  I still love this piece even after having it for so long.  That's the beauty of only using it for a couple months out of the year, I guess!  It is sitting on top of a quilted table runner that my talented sister in law made for me.  I LOVE it.


What fall touches have you put around your home?  Leave a link and I will check it out!

Monday, September 19, 2011

Dresser Makeover

I have been wanting to do this project for a long time.  I finally got around to it the last couple of days, and I'm so glad I waited because I changed my mind on what to do at the last minute!  Here is the little dresser before:


I got this for $5 at an estate sale a year or so ago.  It was exactly what I had been looking for, at the right price, too!!

Here it is at our last house:


This is in our entryway, and holds all our board and card games.  I will have to show in another post how we fit so many games in here.   I had originally wanted to paint it black with a black and white harlequin pattern on the front.  It would have been darling, but I suddenly wanted something lighter instead.  I wanted to keep the harlequin idea, however.  I figured it should be something fun since our fun games were inside.  Silly, I know.  :)  
So, the plan changed to a lighter version.  I also had to use what I had on hand.  First, I gave it a coat of Behr Swiss Coffee.  Then, to create the diamond pattern on the front, I put the drawers in and used a yard stick to draw a light pencil line from corner to corner.  This created an "X" that showed me where the middle of the front was.  Then, I cut out a diamond the size and shape that I wanted.  I drew more pencil lines: one going straight across the middle, and one going straight up and down through the middle. 


 I then placed the first diamond in the center of the dresser and traced it.


Then I traced a row of diamonds along the center going across and then along the vertical pencil line.  After that, I just traced them all in.  They came out pretty straight!  Keep in mind, that I wasn't going for a precise, perfect design.  I wanted a hand-painted, whimsical look.  (which means, I didn't want to be to picky about it, just get 'er done!)  :)
After all the diamonds were traced, I used a small foam brush to paint in the tan diamonds.  The color is Behr Gobi Desert that was I think 50% lightened.  

After the tan was painted, I had to go back with a small foam brush and paint the Swiss Coffee over any showing pencil lines.  Here she is with all the diamonds painted:


After it was painted, I took a sanding block and distressed the edges a bit.  Then, the FUN part...the knobs!! I went to Hobby Lobby when the knobs were all half off and picked out a few fun ones.  They were also some of the cheapest ones, so I think I spent under $15 for all of them.  That makes this whole dresser about $20!!


A close up of the knobs:
Lime green
 Black and silver
 Red glass

Now, I will let it cure for a few days and accessorize the top!!


Saturday, September 17, 2011

Thrift finds

Shauna and I attended Goodwill's half off sale last Saturday.  Here are a few of our finds:

Can you see the potential in this?  I plan on painting it black and applying a white monogram.  $1.50


This was perhaps the best find of the day-a big glass apothecary jar!  I can't wait to fill it with Christmas ornaments, which we also found at Goodwill.  The lid was in a whole different area, but I had eagle eyes that day and found it.  :)


Next to the little guy for size reference:


Here is another diamond in the rough, a HEAVY brass candlestick.  I'm thinking of doing it over in a glossy white, or....yellow?  or red?  Again with the size comparison :) :