Thursday, December 1, 2011

Fabulous recipe!!

I made this super easy, fast and DELICIOUS recipe last night, and had to share!!!  It's one of those, lick-the-bowl-and-everything-that-has-some-of-this-stuff-on-it kind of recipes.  


From OhSheGlows


Yield: Serves 2
Ingredients:
  • 1 medium sized ripe Avocado, pitted
  • 1/2 lemon, juiced + lemon zest to garnish
  • 2-3 garlic cloves, to taste (I used 3 and it was quite garlicky, but if you are not a big fan of garlic use 1 clove)
  • 1/2 tsp kosher salt, or to taste
  • ~1/4 cup Fresh Basil, (probably optional)
  • 2 tbsp extra virgin olive oil
  • 2 servings/6 oz of your choice of pasta (I used 3oz of spelt and 3 oz of Kamut spaghetti)
  • Freshly ground black pepper, to taste

Directions:
1. Bring several cups of water to a boil in a medium sized pot. Add in your pasta, reduce heat to medium, and cook until Al Dente, about 8-10 minutes.
2. Meanwhile, make the sauce by placing the garlic cloves, lemon juice, and olive oil into a food processor. Process until smooth. Now add in the pitted avocado, basil, and salt. Process until smooth and creamy.
3. When pasta is done cooking, drain and rinse in a strainer and place pasta into a large bowl. Pour on sauce and toss until fully combined. Garnish with lemon zest and black pepper. Serve immediately. Makes 2 servings.
Please note: This dish does not reheat well due to the avocado in the sauce. Please serve immediately.

Check this girl out!  She has awesome recipes!!!!  You MUST try this one.  All of my kids liked it, even those who don't like avocado.  It tastes like a good pesto/baba ganouch.   SOOOO yummy.  I took some over to my neighbor and she had to make it for dinner, too!  Let me know if you try it.  :)

Sunday, November 13, 2011

Dishwasher Soap

I have been so frustrated with my dishes lately!!  I run my dishwasher once a day, and have been using Shaklee's dishwasher detergent powder.  LOVE it.  Well, I ran out and was at Costco so got some Cascade action paks, which I have used in the past with great success.  Not this time-I have had serious white residue on my dishes every time I wash them.  Yuck!!

Enter new idea...  I read on a blog (maybe Grocery Shrink?  wish I could remember for sure, sorry!!) that the gal ran out of dishwasher detergent and the only other non-sudsing soap she had on hand was her homemade laundry soap.  This clicked on a light in my head, and I thought, "Hey-I have homemade laundry soap, too!  I should try it!"  Well I did, and it worked!!!  I ran a load of dishes and they came out clean with NO yucky residue!!!

I am going to return the rest of my Cascade to Costco tomorrow and keep using my laundry soap in the dishwasher.  Anyone out there use something in the dishwasher they love?

Update:  the homemade soap worked a couple of times, then started leaving a buildup as well.  I purchased some Lemi-shine, a product I have heard great things about.  When I add this to the soap, it works much much better.  It still irks me to have to add so much stuff.  Why isn't it just cleaning as well as it was before?  grrrrr

Saturday, October 29, 2011

Owl Cake

OK.  I cannot wait to share this any longer-it is too adorable!!  Shauna MADE this AWESOME cake for her niece's birthday.  It was a "Night Owl" party. The girls watched Tangled, played some really cute games, had pizza and cake, and I painted their toenails.


Inspiration came from this adorable cake at SnowyBliss:


Shauna made the fondant using a marshmallow fondant recipe.  She says using that fondant is awesome.  I helped a teeny tiny bit, and it did seem to work really well.  (i don't have much experience with fondant to compare it to, so take her word not mine)  :)


The bottom two cakes are real, and the owl is a styrofoam ball.  "Hoo-Hoo" would have guessed that?  I guess it would be sort of difficult to make a spherical cake.


The birthday girl LOVED it, of course.  "Hoot" wouldn't?   hahaha  OK, enough corny owl humor already.


Bottom line:  When it comes to cakes, Shauna's good.  Real good.  Here is your proof.  :)

Sunday, October 16, 2011

Strawberry Smoothie Tip

Shauna and I recently became the proud owners of Blendtec blenders.  We went back and forth between wanting Vitamix and Blendtec.  We finally went with the Blendtec, for reasons we may get into later.  They are both fantastic products and knew we couldn't go wrong with either, though.

Anyway, on to the tip!!  With this awesome blender, I no longer have to remove the leaves from strawberries!  There are great vitamins and such in those leaves, and I always removed them before because my old blender didn't totally blend up green leafy things.  I guess I could have left them, but never thought about it.  It makes freezing strawberries so easy, no hulling them, just wash and place them out on baking sheets and freeze.  Once frozen, place in bags and they are easy to pull out as needed.


Friday, September 30, 2011

Fall around my house

It was time.  I pulled out my fall decorations and dressed up the house a bit.  I LOVE this part of the year!!  Here is the little dresser that I made over in a harlequin pattern.  I heart this dresser so much now!!  It makes me smile whenever I see it.


This is a shelf I made that fit a little spot perfectly in my last house.  It is a bit small in this house, but until I make (or get) another one, it is fine for now.  


The pinecones came from the neighbors tree.  They won't miss them, right?  They were on the ground, so that makes them community property I think.  Some were even in my yard so they totally count as mine...  :)  
I got the inspiration for arranging the cornucopia on Pinterest. 


I am debating whether I should keep the fall colors of the squash, or paint them creams and light blue-grays, like I've seen around the web.

Here is our music cabinet.  The only money I spent on my fall decorations this year is the $2.50 for this little grapevine pumpkin.  I have a goal to get one new pumpkin every year. 


That cabinet is totally full, so I got this baby at Goodwill for 9 bucks!!! 


 It is a 2 drawer file cabinet.  The drawers are deep and it will hold a lot of music.  I love the front pulls and label slots.  I am still thinking of what color to paint it.  Something not too dark, I am into light and bright these days.  Hmmm, will have to think about this one.

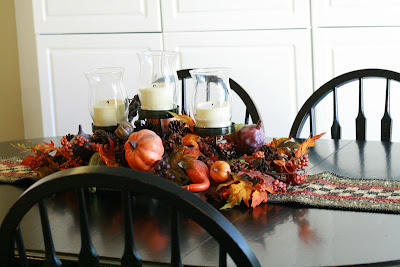
Here is the dining table, with the centerpiece I have had for years.  I got it at Kirkland Home, one of my favorite little stores.  I still love this piece even after having it for so long.  That's the beauty of only using it for a couple months out of the year, I guess!  It is sitting on top of a quilted table runner that my talented sister in law made for me.  I LOVE it.


What fall touches have you put around your home?  Leave a link and I will check it out!

Monday, September 19, 2011

Dresser Makeover

I have been wanting to do this project for a long time.  I finally got around to it the last couple of days, and I'm so glad I waited because I changed my mind on what to do at the last minute!  Here is the little dresser before:


I got this for $5 at an estate sale a year or so ago.  It was exactly what I had been looking for, at the right price, too!!

Here it is at our last house:


This is in our entryway, and holds all our board and card games.  I will have to show in another post how we fit so many games in here.   I had originally wanted to paint it black with a black and white harlequin pattern on the front.  It would have been darling, but I suddenly wanted something lighter instead.  I wanted to keep the harlequin idea, however.  I figured it should be something fun since our fun games were inside.  Silly, I know.  :)  
So, the plan changed to a lighter version.  I also had to use what I had on hand.  First, I gave it a coat of Behr Swiss Coffee.  Then, to create the diamond pattern on the front, I put the drawers in and used a yard stick to draw a light pencil line from corner to corner.  This created an "X" that showed me where the middle of the front was.  Then, I cut out a diamond the size and shape that I wanted.  I drew more pencil lines: one going straight across the middle, and one going straight up and down through the middle. 


 I then placed the first diamond in the center of the dresser and traced it.


Then I traced a row of diamonds along the center going across and then along the vertical pencil line.  After that, I just traced them all in.  They came out pretty straight!  Keep in mind, that I wasn't going for a precise, perfect design.  I wanted a hand-painted, whimsical look.  (which means, I didn't want to be to picky about it, just get 'er done!)  :)
After all the diamonds were traced, I used a small foam brush to paint in the tan diamonds.  The color is Behr Gobi Desert that was I think 50% lightened.  

After the tan was painted, I had to go back with a small foam brush and paint the Swiss Coffee over any showing pencil lines.  Here she is with all the diamonds painted:


After it was painted, I took a sanding block and distressed the edges a bit.  Then, the FUN part...the knobs!! I went to Hobby Lobby when the knobs were all half off and picked out a few fun ones.  They were also some of the cheapest ones, so I think I spent under $15 for all of them.  That makes this whole dresser about $20!!


A close up of the knobs:
Lime green
 Black and silver
 Red glass

Now, I will let it cure for a few days and accessorize the top!!


Saturday, September 17, 2011

Thrift finds

Shauna and I attended Goodwill's half off sale last Saturday.  Here are a few of our finds:

Can you see the potential in this?  I plan on painting it black and applying a white monogram.  $1.50


This was perhaps the best find of the day-a big glass apothecary jar!  I can't wait to fill it with Christmas ornaments, which we also found at Goodwill.  The lid was in a whole different area, but I had eagle eyes that day and found it.  :)


Next to the little guy for size reference:


Here is another diamond in the rough, a HEAVY brass candlestick.  I'm thinking of doing it over in a glossy white, or....yellow?  or red?  Again with the size comparison :) :

Thursday, September 15, 2011

Gift Idea

Last week my younger girls were invited to their cousin's 9th birthday party.  We were short on funds to buy a present, so I went through my stash of craft supplies and put together a crafting kit for the birthday girl.  What 9 year old girl doesn't love crafting, and especially with her very own stuff.
Here is what we put in her package:


There is patterened paper, solid cardstock, a small mat stack, some alphabet stickers, card sized envelopes, a ziploc full of embellishments, a craft stick wound with several different types of ribbon, and a plastic pouch to keep it all in.


For the embellishments I included paper flowers, brads, buttons, and some punched cardstock shapes.  I was going to add a glue stick but forget.  Oops!


She LOVED it (and will have to hide it from her mom, because she loved it, too!).  I will definitely use this idea again!!  (and it helps clear out my stash, too!) :)

What great "re-cycled" gift ideas do you have?

Tuesday, August 9, 2011

School lunches


Probably the thing I am most apprehensive about with school starting is the whole school-lunch thing.  The schools my kids go to (I am very sorry to say, but being honest here) have TERRIBLE food.  I mean, really bad.  My kids BEG me not to have to eat it.  Well, actually that's just the elementary school.  The Jr. High/High school doesn't have a cafeteria per se, but you can buy food like Little Caesar's pizza, etc.  Which tastes good, but is expensive and not good for you.  This leaves me with the option to make their lunches.  Every day.  5 lunches.  Dad also takes a lunch, so that makes 6 lunches.
I don't know why, but this frequently stumps me and I get in a rut.  They don't like sandwiches every day; I know I don't either!
So I am on a quest this year, to make and send my family off with healthy, diverse lunches that don't break the bank.  Here are some ideas I have found:


Homemade Lunchables using healthy ingredients
Mini muffins and fruit
Sandwich roll-ups
Wraps
Quesadillas
Pita Pizzas
Hummus and pita slices
Pasta salad
Salad
Chips and salsa
Chicken Ceasar Salad Wrap
Cream cheese and jam sandwich or bagel
Sandwich on a stick
Leftovers
Meatloaf
Pancake sandwich
Waffles and syrup or applesauce to dip  Add a boiled egg, too
Homemade pizza pockets or ham and cheese pockets
Yogurt and fruit
crackers and cheese
Soup in a thermos
Hummus and veggie wrap

Sides:
veggie sticks and dip
fruit
make sweet potato chips
popcorn
trail mix
homemade chex or snack mix
freeze dried fruit and/or veggies
granola bars
yum balls
taco munch


Here are some great websites where I grabbed a lot of these ideas:


Does this give you some good ideas?  I feel a little more prepared with some new options under my belt.  I have also decided to try "theme days".  For example, Monday is sandwich day.  Tuesday is leftover day (with all these people, I am going to have to make sure I make a lot of dinner on Monday nights so we have enough leftovers on Tuesday).  Wednesday is wrap day.  Thursday is finger food day.  Friday is make your own or buy it day.  The older kids don' t have school on Fridays, and I am going to take a break on this day.  Sounds fair to me, yes?  

What good ideas do you have for packing lunches?

Monday, August 8, 2011

Roasted broccoli

We had some family over the other night, and I wanted to cook some broccoli quickly.  I decided to put it on a sheet pan and roast it in the oven, just like I do asparagus.  Well...it worked!!  It was so tasty and good for us because it didn't have any heavy sauce on it or anything.  
Just cut the broccoli into florets.  Drizzle with olive oil and season with salt.  Roast until done.  SO easy, quick and delicious!

Note:  I made this again yesterday.  Turns out the broccoli is still good even if you forget about it and it gets VERY toasty in the oven.  :)  Yum!  

Wednesday, July 13, 2011

Pots and lids

I have a problem in my pot and pan cupboard.  It looks like this:


In my current house, my cabinet space is limited.  So except for my really big stock pots, this is all my pots and pans.  The lids are everywhere, just tossed in which makes for a very messy cupboard.  I could just buy one of those lid holder things and fix this problem.  But with a budget of zero for this project, that wasn't an option.
Here is my solution:


(sorry-I didn't realize ALL my pics came out so blurry!!)
I saw this idea on Miller's Grain House and knew I could use it!  I had some wide elastic, some thumbtacks and a hammer.  That's all you need!  You just nail a strip (or as many as you need, I did two) of elastic across the door of your cabinet, hang the lids in there, and voila!


Now my cabinet looks much better and it's so much easier to work with.  Do you have a good solution for your lids?

Sunday, July 3, 2011

Recipe: A Couple of Summer Salads

When was the last time you went to your local farmers market? Do you know if there's one in your area?
Sally and I took a little trip down to our local farmers market and came home with some fabulous ingredients for the perfect summer lunch!

As previously mentioned, we live in the sweltering desert.  Summer meals are a little different, generally lighter, and often cold. Our farmers market trip inspired two salads that became part of a delicious lunch. Add to them a batch of Sally's delicious homemade chipotle baba ganoush (pronounced "ga-noosh"; recipe to come in a future post) with pitas or chips and you have a FABULOUS meal!

We decided to share our summer salad variations, and would love to hear about your great summer variations and meal ideas!

Ok, this salad is a version of caprese, and for those purists out there perhaps we shouldn't even call it caprese! However,  in my mind the basics of a caprese can be altered to suit your needs at the moment.
If you are looking for the wonderful traditional style caprese I suggest following Pioneer Woman's recipe.

We came up with this take on caprese as we stood in front of a table of the most beautiful array of heirloom tomatoes! We had already decided to get some cheese curd, and the tomatoes seemed like the perfect pairing.  A word to the wise - don't go to the farmers market hungry, you will spend much, much more...
Don't you just LOVE fresh local ingredients?!
We sure do!
Sally and I were smitten with a gorgeous array of fresh picked tomatoes.
Just look at those colors!


I don't know if this picture adequately reflects the beauty of this colorful bowl of deliciousness!
The little yellow pear tomatoes came from Sally's backyard.

The other ingredients:


Ok, this is where we left the traditional - fresh local cheese curd. Yes, I know it's not mozzarella, but trust me on this one - it is delicious and goes perfectly with the other ingredients! We also used some great basalmic vinegar from Trader Joe's, organic olive oil from Costco, and fresh basil from Sally's kitchen window herb garden (I definitely need to get one of those!!!). Not pictured - salt & pepper (VERY important), we used fresh ground pink himalayan salt and fresh ground black pepper. YUM!
We decided to cut the tomatoes into chunks because of the various sizes and combine everything in the bowl, then drizzle on the basalmic, and olive oil. The salt & pepper were added to our liking and that's it! Enjoy!


Tips: 1. Use LOTS of fresh basil.  2. If you don't like this salad "juicy" remove the seeds and lightly squeeze the tomatoes before chopping.  3. Try this with jalapeno cheese curd (definitely not traditional, but so tasty!)  4. This is excellent with fresh bread - you can go with a crusty loaf, or stick with homemade whole wheat.
YUM!


Salad 2: Sally's masterpiece of culinary delight:


The farmers market also has a line of fresh pestos and sauces that Sally has been telling me about for weeks. Her favorite? Sun dried tomato pesto.  She wasn't kidding - this stuff is divine!  She boiled up some multi-colored veggie pasta, stirred in some of the sun dried tomato pesto, added diced cucumber, red bell pepper, tomatoes, some of the jalapeno cheese curd (yes, we are definitely cheese people!), and a bit of her homemade asian dressing. Delicious! I want some right now!!  :)

Friday, July 1, 2011

Book Review

I can't get my nose out of my newest cookbook.  Yes, I am a cookbook reader.  But this one is an especially good read.  It was less than $10 on Amazon, and I highly recommend it.  It's called "The Diet Rebel's Cookbook".  This baby is CHOCK FULL of great info, and goes very well with one of my other very favorite cookbooks "The Eat Clean Diet Cookbook For Family & Kids".


These are both super books, with delicious and healthy recipes that families will love.  And they are so user friendly and fun to read.  Are YOU a cookbook reader??

Wednesday, June 29, 2011

Easy Dinner Recipe

This isn't really a recipe, but more an idea.  One of our favorite easy dinners is a Mexican French Bread Pizza.
Just take a loaf of French bread (homemade or store bought, up to you).


Slice it open lengthwise.


Spread with refried beans and top with grated cheese.
Broil or bake until the cheese is melted.


Cut into pieces, we usually go with about 3 inch pieces.


Top with your favorite toppings!  Here is mine topped with salsa, avocado, tomato, sour cream, and hot sauce.  SOoooOOO good!  Fast and easy to boot!

Sunday, June 26, 2011

Super Easy Decoupage Frame

I am trying to add some cute things into my kitchen.  When I was going through my monster file box, I came across a $1 wooden frame Shauna and I picked up at Michael's a while back.  It got buried and forgotten.  Well, as soon as I found it I grabbed a piece of scrapbook paper and went to town!
Here it is before, with my supplies: 


I painted the frame's back and sides with acrylic craft paint.  I mixed some blue and green to get the color I wanted.  When that was dry, I laid the frame upside down on the scrapbook paper and traced around it.  Then I cut out the paper and used Mod Podge to adhere it to the frame.  I then took a sanding block and sanded the edges so none of the paper was hanging over the edges of the frame.  To give it a little more "oomph", I took a blue ink pad and inked the edges of the frame.  I love distressing, whether it is with ink, paint, sanding, etc.
Here it is, all ready for a cute picture: